Quick Start
1. Sign in
Open SecurePACS in a supported modern browser using the web address provided by your organization.
2. Find studies
Choose the intended source or workspace, then use the Studies tab to search personal, shared, or organization studies.
3. Open the viewer
Open a study with Open in new Window. Allow popups for SecurePACS if the browser blocks the viewer.
4. Manage work
Upload studies, manage shares, download when allowed, and use My Account for status, recovery key, and upgrades.
Sign In And Account Access
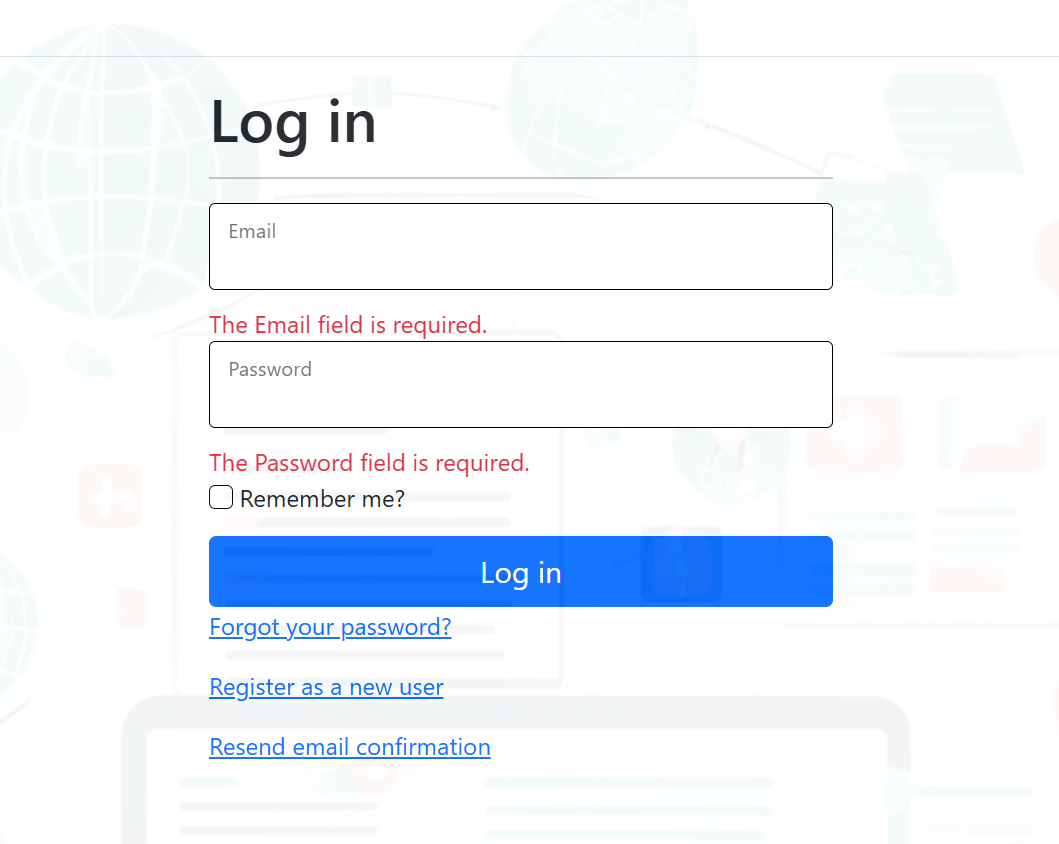
Sign in
- Enter your email address.
- Enter your password.
- Use Remember me only on a private workstation.
- Select Log in.
If your account has not confirmed its email address, use the confirmation email or the Resend email confirmation link. If you do not have an account, use Register as a new user and follow the email confirmation flow.
If two-factor authentication is enabled, SecurePACS asks for an authenticator code after your password. Use a saved two-factor recovery code only for the account sign-in prompt that asks for it.
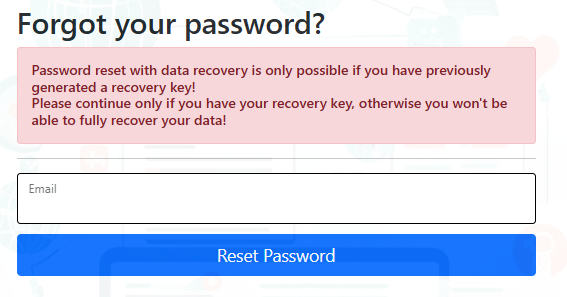
Reset a password
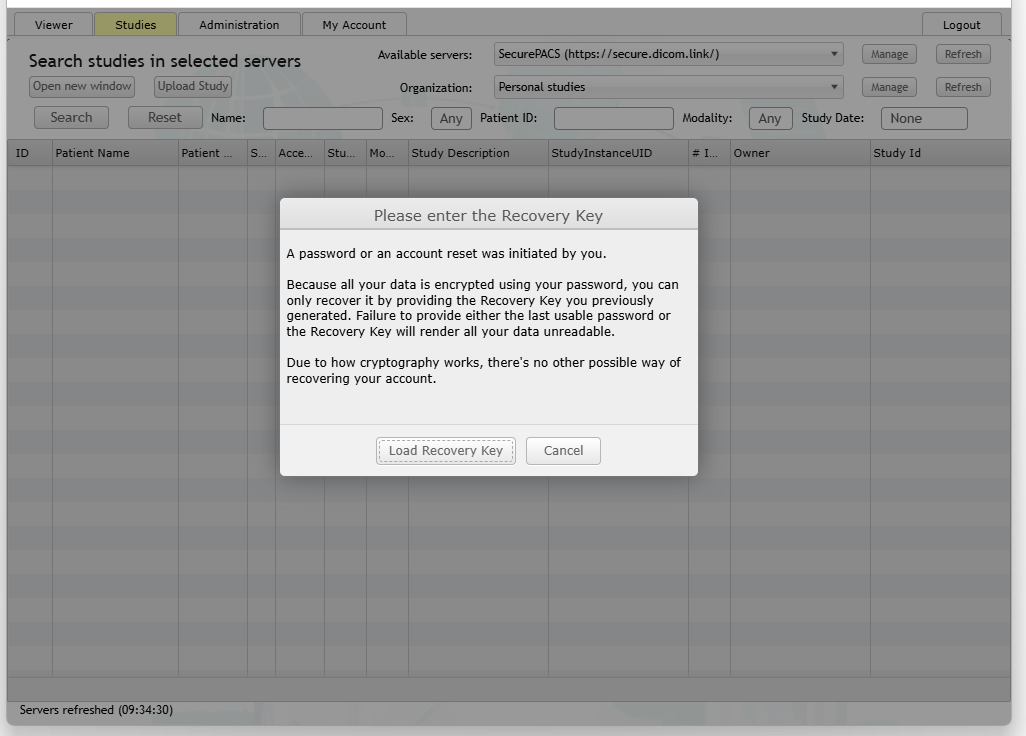
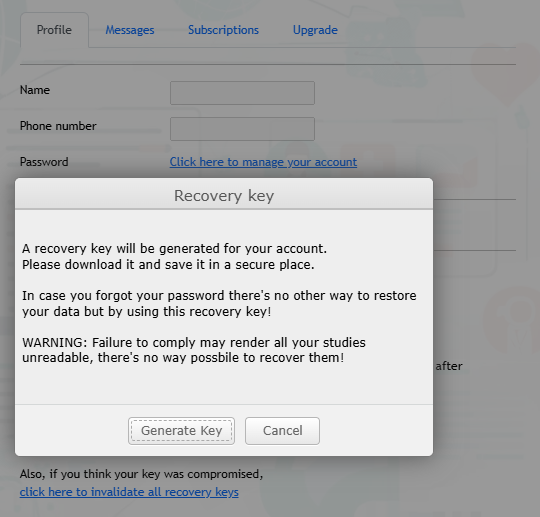
Use Forgot your password? from the sign-in page. Password reset restores sign-in access, but SecurePACS may ask for your SecurePACS recovery key before older protected studies can be opened. A SecurePACS recovery key is different from two-factor recovery codes.
Keep your recovery key private. Do not include it in support tickets, emails, chat messages, or screenshots.
First account initialization
On first use, SecurePACS may show an account initialization prompt. Complete that flow before uploading, sharing, or viewing protected studies.
- Follow the on-screen setup prompt.
- Create or confirm your recovery key if requested.
- Store the recovery key somewhere private.
- Return to Studies after setup is complete.
The recovery-key section in My Account tells you whether a recovery key is already available or needs to be created, replaced, or invalidated.
Workspace Overview
After sign-in, SecurePACS opens as a tabbed workspace. The visible tabs depend on your permissions, but the common areas are:
| Area | Use it for |
|---|---|
| Studies | Search, list, open, share, download, delete, and inspect studies. |
| Administration | Access My Settings (notifications, search preferences, DICOMweb and DICOM Node connection details) and My organizations. |
| My Account | Review account status, messages, storage usage, recovery key, subscriptions, and upgrades. |
| Logout | End the current browser session. |
Find Studies
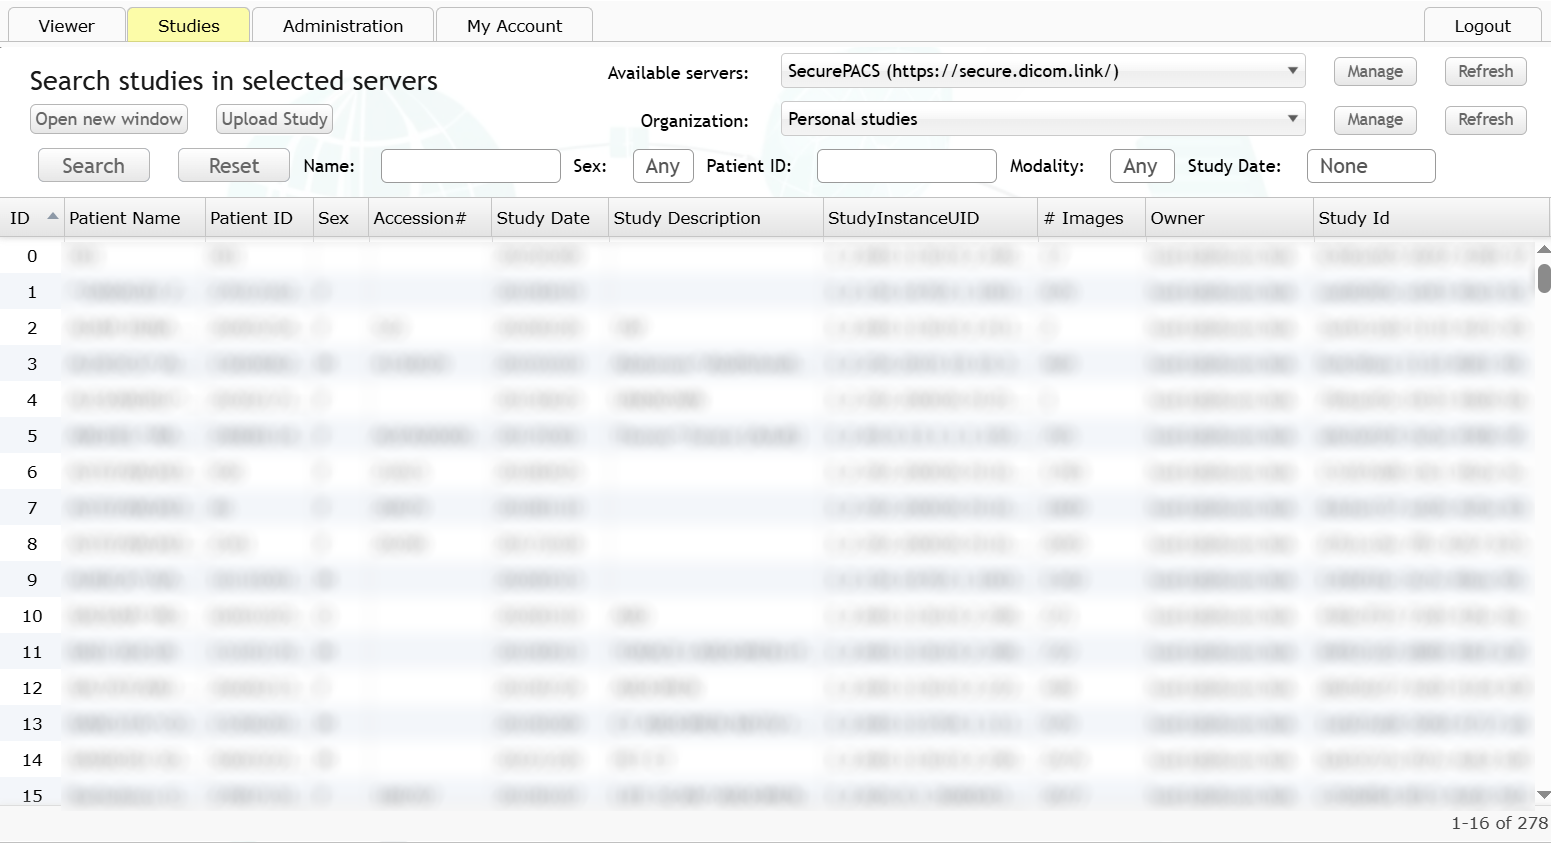
The Studies tab is the main worklist. It can search personal studies, studies shared with you, and organization-owned studies, depending on your account and selected context.

Search fields
| Field | Typical use |
|---|---|
| Source or workspace | Choose personal studies, shared studies, an organization, or another available study source. Use Refresh if the source list looks stale. |
| Patient name | Find a patient by name. Use demo names in screenshots. |
| Patient ID | Find a study by local patient identifier. |
| Recorded sex | Filter by the value stored with the study, when present. |
| Accession number | Find a study by accession number when this field is visible. |
| Referring physician | Find studies by referring physician when this field is visible. |
| Study date | Search today, yesterday, this week, last week, this month, last month, this year, last year, or a custom range. |
| Modality | Filter by CT, MR, US, DX, CR, MG, PT, SR, and other DICOM modalities. |
To search: choose the intended source, enter one or more filters and a date preset or custom range, then select Search. Use Reset to clear filters before a new search. If a query is running, SecurePACS can show progress or let you cancel and run a narrower search.
Read the worklist
The result grid can show patient and study fields such as row ID, patient name, patient ID, recorded sex, accession number, study date, modalities, study description, image count, owner, and Study Instance UID. The Study Instance UID is a technical identifier sometimes needed for support. Treat all patient and study values as sensitive — public screenshots must use test or anonymized studies.
Study action menu
Select a study row and open the action menu. Available actions depend on the selected study source and your permissions.
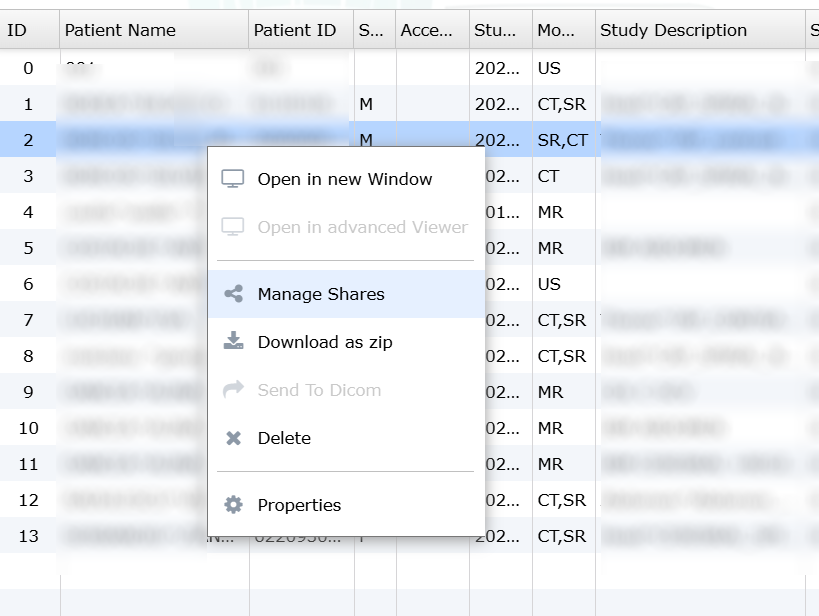
| Action | What it does |
|---|---|
| Open in new Window | Opens the study in the web viewer. |
| Open in advanced Viewer | Opens the study in the advanced viewer when enabled on your account. Shown as inactive on plans where this feature is not included. |
| Properties | Shows study details, owner, optional sender email, and optional sender message. |
| Manage Shares | Opens sharing and permissions for the study. |
| Download as zip | Starts the study download flow when allowed. |
| Send To Dicom | Routes the study to a connected DICOM destination when configured. Shown as inactive when no DICOM node is configured or the feature is not available on your plan. |
| Delete | Removes the study from the active worklist when you own it or have the required permission. Deleted studies may not be recoverable. |
Some actions may be hidden or disabled for shared studies, organization studies, connected external sources, or accounts without the required rights.
View Studies
Use Open in new Window from the study action menu. SecurePACS opens the DICOM viewer in a separate window or tab. If the browser blocks popups, allow popups for SecurePACS and try again.
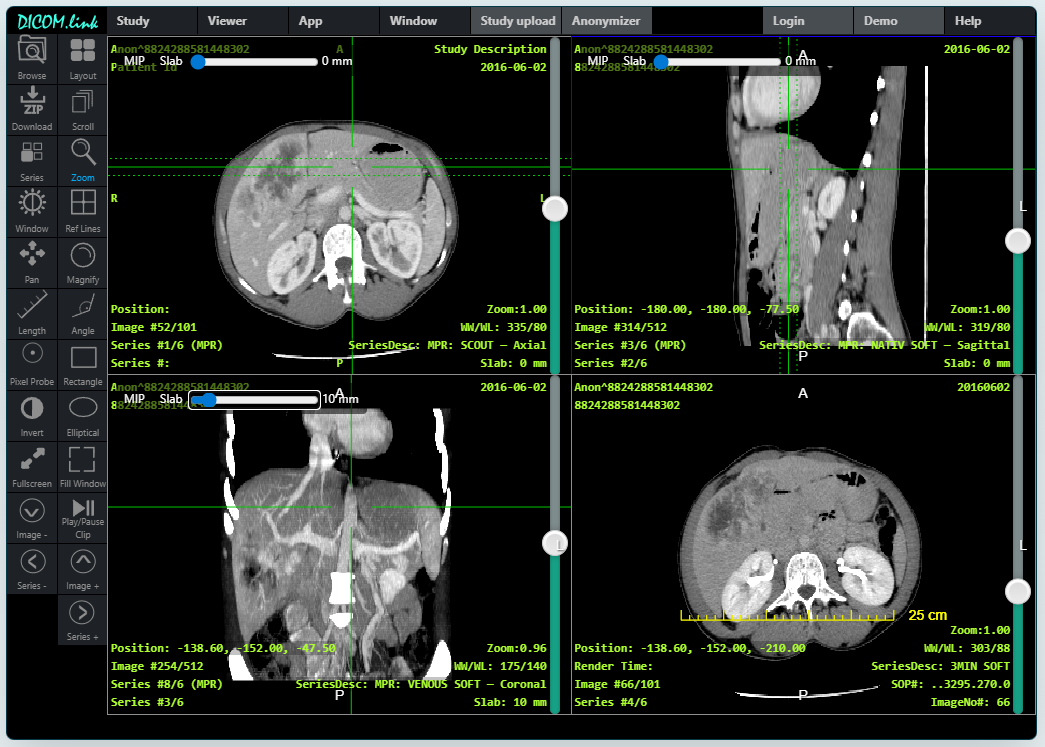
In the viewer you can:
- Browse images and series.
- Use the toolbar to adjust brightness/contrast, pan, zoom, scroll through images, invert colors, measure, change layout, or switch to fullscreen.
- Open series thumbnails and load a different series.
- Use cine controls for multi-frame studies when available.
- Open DICOM tags when you need to inspect study metadata.
- Use MPR tools when enabled for the study and viewer configuration.
This manual covers only the viewer basics needed from SecurePACS. For advanced viewer tools, refer to the separate viewer manual when available.
Download from the viewer
If download is allowed, the viewer can ask for confirmation and open a SecurePACS download dialog. Keep the download window open until the browser finishes saving the file. If the browser asks for download permission, allow it only when you intentionally started the download.

Upload Studies
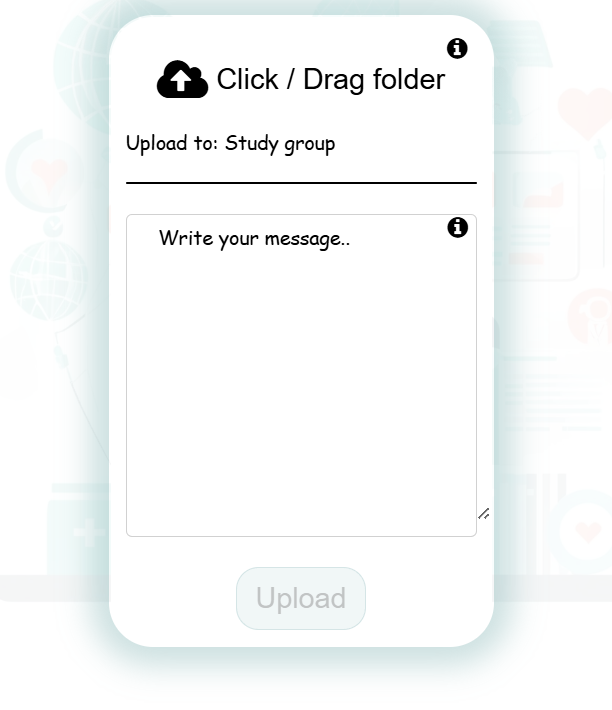
Use Upload Study from the Studies workspace. SecurePACS opens the upload panel.
Upload workflow
- Select Upload Study.
- Use Click / Drag folder to choose or drag a folder containing DICOM files.
- Wait for SecurePACS to scan the folder.
- Confirm the Found N files count when it appears.
- If the upload form includes sender email or message fields, complete them according to your organization's workflow.
- Select Upload after the button becomes available.
- Keep the browser tab open until upload completes. If you try to close or navigate away, the browser may warn you that unsaved changes will be lost — stay on the page until the upload finishes.
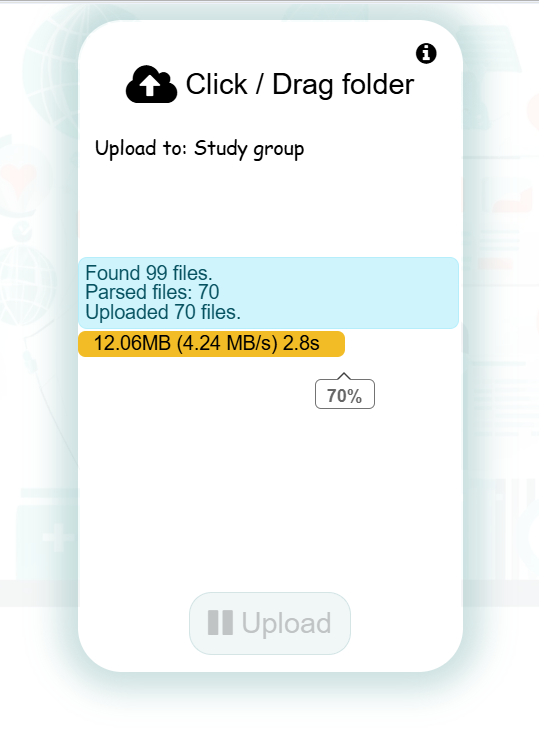
During upload, SecurePACS shows progress such as parsed files, uploaded files, unsupported files, total uploaded size, speed, and elapsed time. Unsupported or non-DICOM files may be skipped while valid DICOM files continue.
When upload finishes, the panel can show Finished, Upload finished!, and New upload controls. Some public upload flows may show a QR or share prompt after completion.
Some deployments upload to a configured external imaging destination. When that mode is enabled, the upload panel shows the destination name and uses the same select, scan, progress, and finish pattern.
Upload troubleshooting
| Symptom | What to do |
|---|---|
| Upload button stays disabled | Wait for file scanning to complete. If it stays disabled, reload and choose the folder again. |
| Unsupported files are counted | Remove non-DICOM files from the folder or ignore them if the valid DICOM images uploaded successfully. |
| Upload retries | Keep the tab open. Retry messages can appear after a temporary network or server error. |
| Upload error messages | Check your network and session, confirm you have upload permission, then restart the upload if SecurePACS cannot recover automatically. |
| Upload fails after sign-in expires | Sign in again, then restart the upload. |
| Private browsing loses local state | Safari, iOS browsers, private browsing, or browsers without persistent local storage may use memory-only mode. Use a normal browser window when you need local study state to persist. |
Share Studies
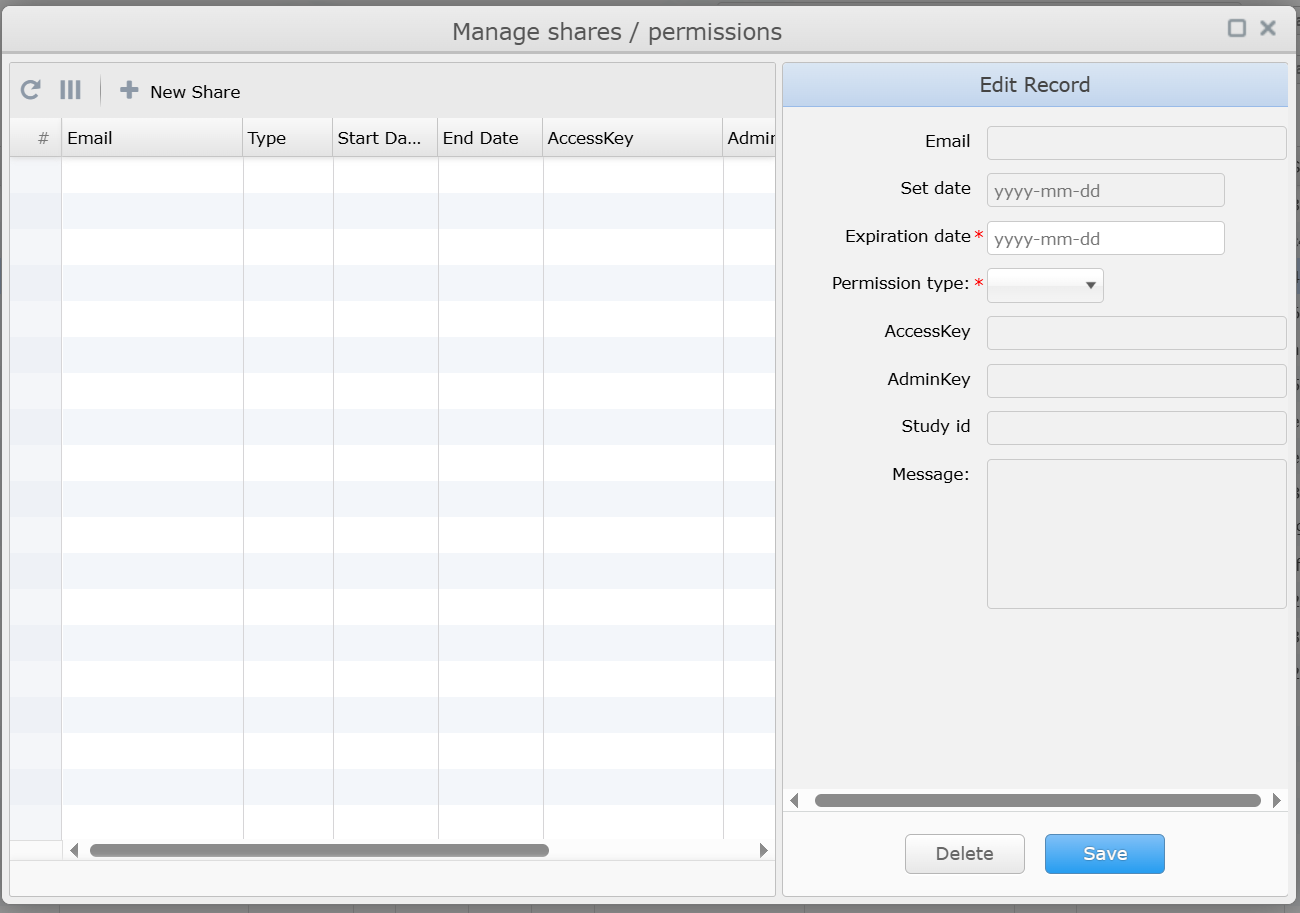
Use Manage Shares from a study action menu to review existing access or create a new share.
Create a share
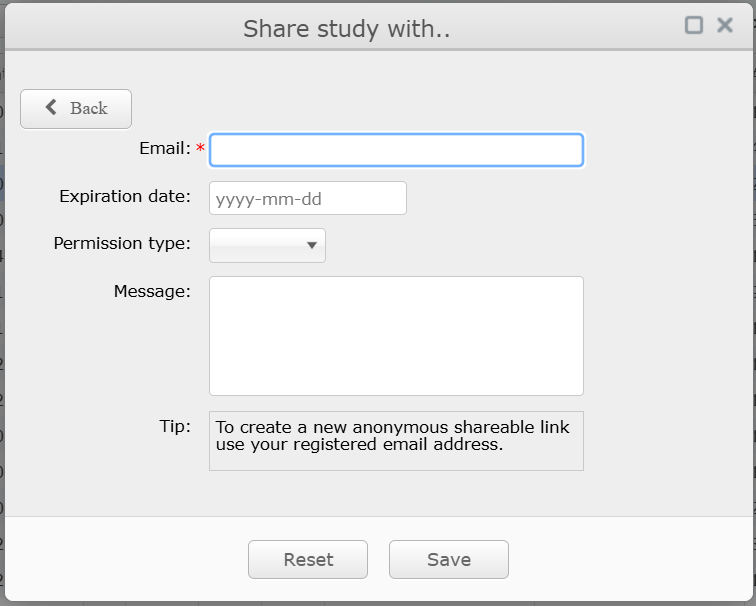
- Open the study action menu and select Manage Shares.
- Select New Share.
- Enter the recipient email address.
- Choose an expiration date if the share should end automatically.
- Choose the permission type.
- Add a short message if needed, without patient identifiers or sensitive study details.
- Save the share.
| Permission | Meaning |
|---|---|
| View | Recipient can inspect the study. |
| Download | Recipient can open and download the study. |
| Edit | Recipient can change allowed study details or related actions where enabled. |
| Admin | Recipient can manage sharing where allowed. Use only for trusted users who should manage access. |
Do not paste share links or study identifiers into public support channels.
Share with a recipient who does not have an account
To generate a shareable link for someone who does not have a SecurePACS account, enter your own registered email address as the recipient email when creating the share. SecurePACS generates an anonymous shareable link. Pass that link to the intended recipient through a secure channel. Do not post shareable links in emails, messages, or public channels beyond the intended recipient.
Change or revoke access
From Manage Shares, select the share row. You can update permission or expiration when your rights allow it. Use delete/revoke controls to remove access. Share removal and study deletion can affect access immediately and may not be recoverable.
Receive a shared study
Shared studies appear in your available study list or shared-study context after you sign in with the recipient email address. If you cannot open a shared study, verify that you are using the same email address that received the share and that the share has not expired.
If the share was created as an anonymous link, recipients can open the study in the viewer or download it directly from the share link without signing in to SecurePACS. Anonymous links are subject to the expiration date and permission level set by the person who created the share.
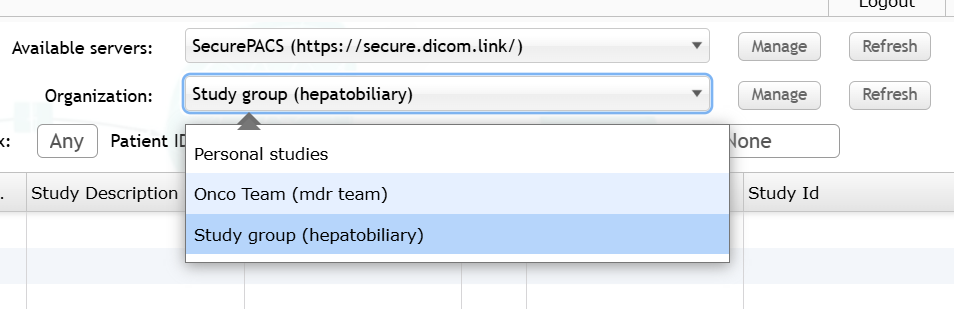
Organizations
Organizations let teams manage shared study ownership and membership. The organization controls you see depend on your account tier and permissions.
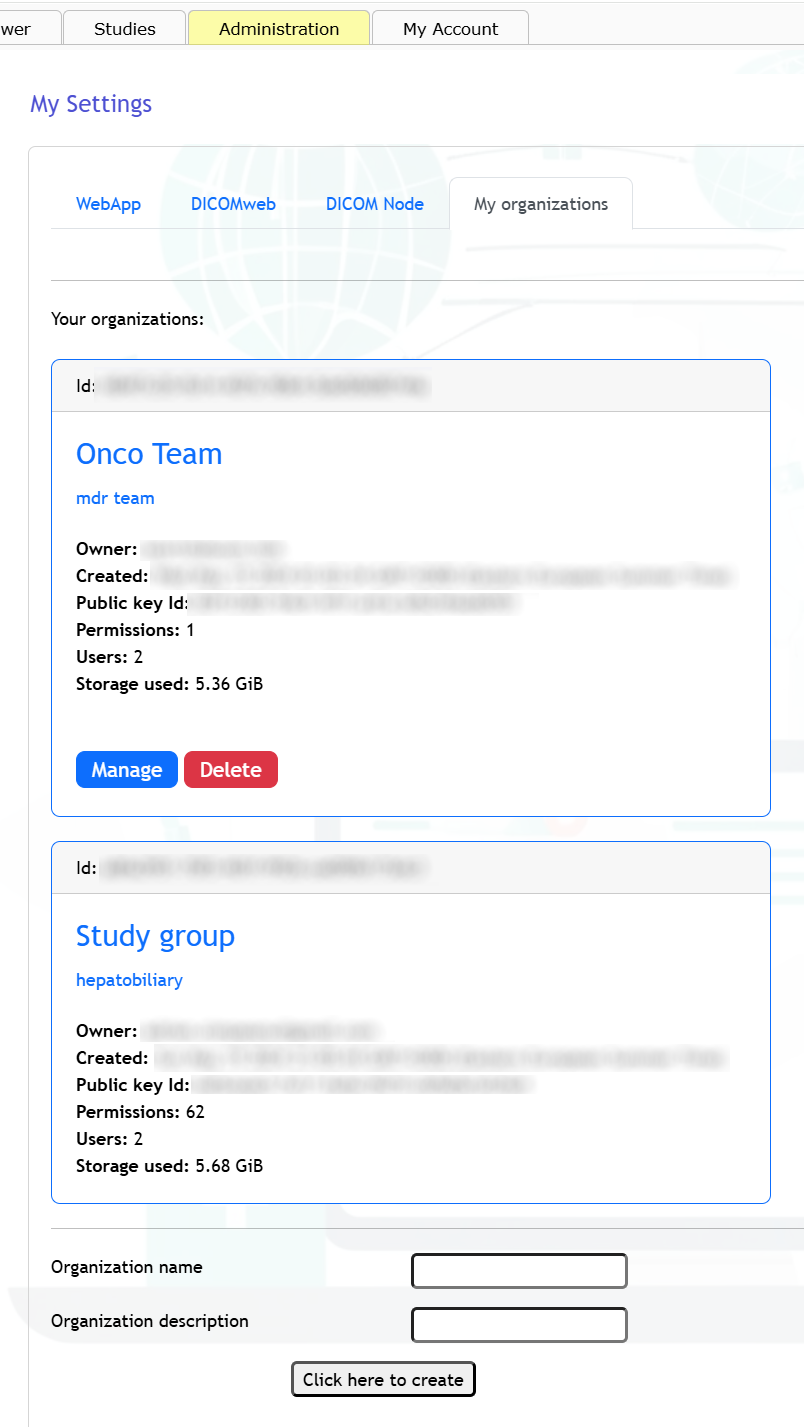
Work with organizations
- Open Administration, then My Settings > My organizations when those controls are available.
- To create an organization, use the create controls, enter the organization name and description, then save.
- Organization cards can show name, description, owner, created date, permissions, user count, and storage use.
- Pending invitations can be joined or canceled.
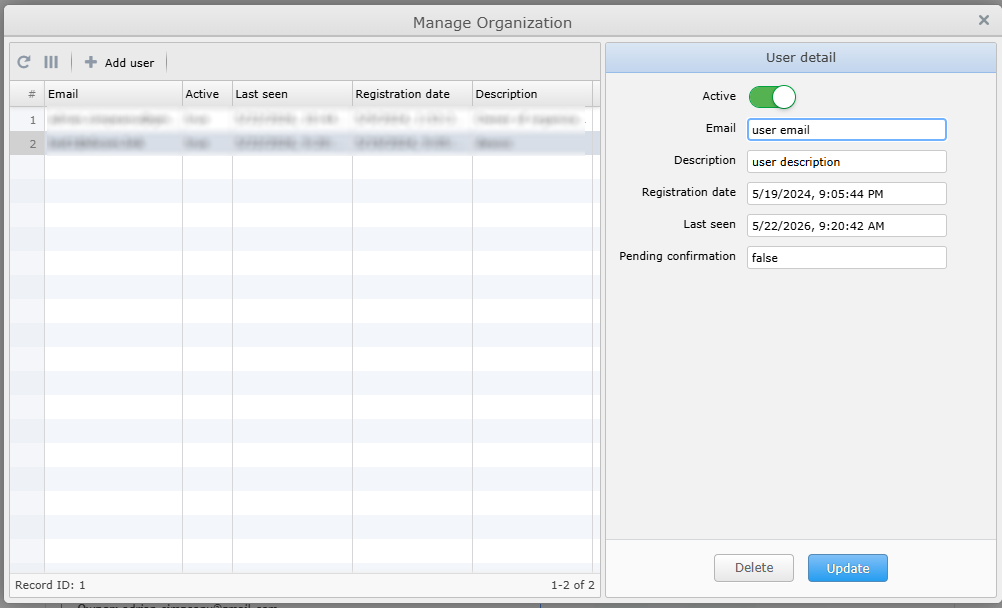
- Owners can manage organization users; non-owners may see membership without management controls.
- To add a user, open the organization management dialog, enter the user's email address, choose the appropriate permission, and save.
Personal and organization studies
Personal studies belong to your own account. Organization studies belong to the organization and can be visible to organization members according to permissions. When uploading or searching, confirm that the selected context is the one you intend to use.
My Account
Open My Account to review account state and self-service options.
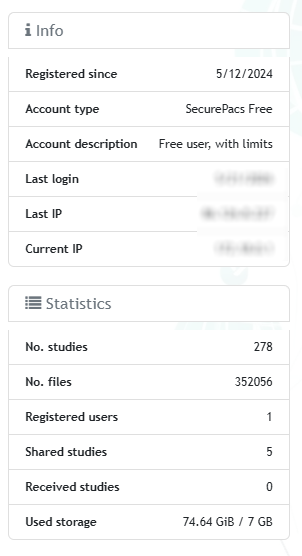
The account area can show:
- Member since or registration date.
- Account type and description.
- Study, file, shared-study, and received-study counts.
- Used storage and storage limit.
- Profile and messages tabs.
- Subscriptions and upgrade tabs.
- Account management link for profile, password, external sign-ins, and personal data options.
- Recovery-key status.
- Account security or session metadata, depending on deployment.
Use the account management page for profile, password, external sign-in, and personal data settings when those controls are available. The profile page shows your username (read-only) and an optional phone number field you can update.
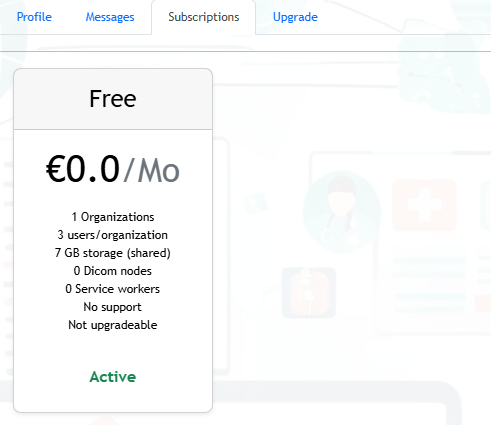
Subscriptions And Upgrades
Use Subscriptions to review your currently active plan. Use Upgrade to compare available plans and add one to the cart.
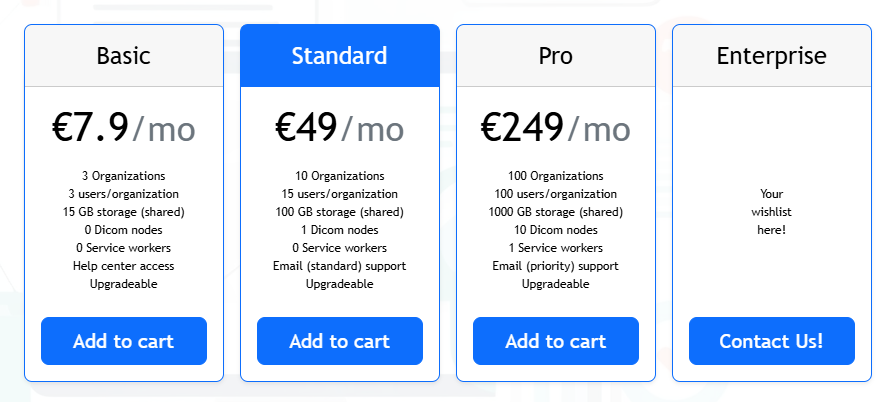
The Upgrade tab compares paid plans: Basic, Standard, Pro, and Enterprise. Enterprise plans are configured on request. The app shows current prices and availability — do not rely on screenshots or this manual as a price list.
To upgrade
- Open My Account.
- Select Upgrade.
- Review the current plan comparison in the app.
- Add the desired plan or storage option to the cart.
- Select Proceed to Checkout.
- Complete checkout on the secure payment page that opens from SecurePACS.
- Return to SecurePACS and refresh if the account does not update automatically.
If checkout fails to open, check popup blocking, network connectivity, and whether your session is still active. If a storage upgrade is unavailable, choose an eligible account plan first or ask the organization owner or administrator.
Settings And Notifications
Open the Administration tab to access My Settings. The settings panel has four sub-tabs.
WebApp settings
The WebApp sub-tab shows the real-time Live Link connection status for your current session, notification preferences, and search options.
Notification preferences you can enable or disable:
- Forward private messages to my email — sends an email when someone sends you a message in SecurePACS.
- Email me on studies shared with me — sends an email when a new study is shared with your account.
Search preferences in the Misc section:
- Show only my studies — limits the default study list to studies you own.
- Use wildcard (*) searches — enables wildcard matching in name and ID search fields.
DICOMweb and DICOM Node settings
The DICOMweb and DICOM Node sub-tabs contain technical connection settings for receiving studies from DICOM imaging equipment or remote servers.
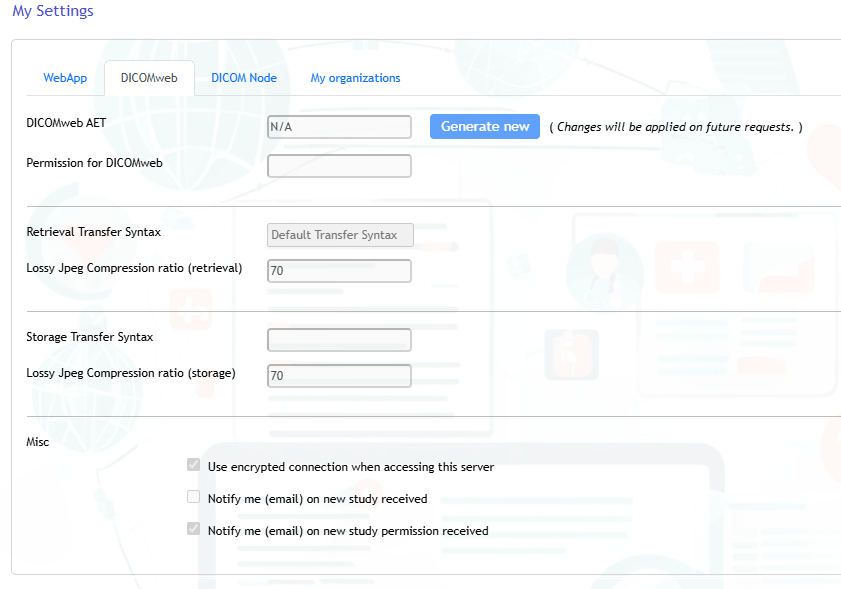
These settings are typically configured by an administrator. If you need to send studies from imaging equipment directly to your SecurePACS account, ask your administrator for the correct AET and connection details. Do not change these values without guidance — an incorrect configuration can prevent studies from arriving.
The DICOMweb tab also offers email notifications for incoming studies and study permission events when those features are available on your account tier.
My organizations
The My organizations sub-tab provides the same organization management controls described in the Organizations section.
General guidance
- Use Refresh controls when source lists appear stale.
- Use Logout when leaving a shared workstation.
SecurePACS updates the page automatically when studies, shares, invitations, subscriptions, or sessions change. If automatic updates stop, refresh the page and sign in again if prompted.
Troubleshooting
| Problem | What to check |
|---|---|
| I cannot sign in | Confirm email/password, email confirmation, and whether the session expired. Use password reset if needed. |
| I reset my password but cannot open studies | Use your SecurePACS recovery key or last usable password if prompted. A SecurePACS recovery key is different from two-factor recovery codes. |
| Search returns no studies | Check selected source, organization context, filters, date range, spelling, and permissions. |
| Search seems stuck | Cancel the query if available, reset filters, and run a narrower search. |
| Viewer does not open | Allow popups for SecurePACS, then use Open in new Window again. |
| Viewer opens but no image is selected | Click an image area or choose a series thumbnail, then retry the viewer tool. |
| Download does not start | Confirm you have download permission and keep the download dialog open after selecting Start download. |
| Upload is slow | Keep the tab open. Large studies and slow networks can take time. |
| Upload reports unsupported files | Remove non-DICOM files from the folder or continue if the valid DICOM files uploaded. |
| Share fails | Confirm recipient email, expiration date, permission type, account setup, and your rights on the study. |
| Recipient cannot access a share | Confirm the recipient signs in with the same email address used in the share and that the share has not expired. |
| Anonymous link does not work | Confirm the link has not expired and was passed to the recipient without modification. Check that the share still exists in Manage Shares. |
| Organization controls are disabled | You may not be the organization owner or may not have management permission. |
| Upgrade or checkout fails | Check popups, network connectivity, session state, and try again from My Account. |
| Public screenshot needed | Use demo data only. Hide patient names, patient IDs, accession numbers, Study Instance UIDs, share links, emails, IP addresses, public key IDs, payment/customer identifiers, recovery-key material, two-factor recovery codes, and organization names. |
What This Manual Does Not Cover
- Programmatic integration details.
- Technical architecture, deployment, server administration, logging, and security implementation details.
- Full DICOM viewer documentation.
- Other product manuals and administrator-only documentation.
Those topics are handled outside this user manual.